
Building your own gaming PC is not only satisfying but can also save you money while ensuring you get exactly what you need. In this guide, we'll walk through a complete budget-friendly gaming PC build for 2023 that offers excellent performance without breaking the bank. This build is perfect for playing popular titles like Counter-Strike 2, Valorant, Fortnite, and even demanding AAA games at respectable settings.
Table of Contents
Setting Your Budget
For this build, we're targeting approximately 5,000-6,000 DKK (roughly $700-850 USD) for the entire system. This price range allows for a balanced build without significant compromises. We'll focus on essential components that provide the best gaming performance, with options to scale up or down depending on your specific needs.
Budget Tip
Component prices fluctuate frequently. Consider shopping during sales events like Black Friday or seasonal promotions to maximize your budget. Additionally, some components (like storage or RAM) can be easily upgraded later, allowing you to start with the basics and expand over time.
CPU Selection
The processor is the brain of your system, and getting the right balance of performance and value is crucial for a budget build. In 2023, the midrange CPU market offers exceptional value.

Our Pick: AMD Ryzen 5 5600
The Ryzen 5 5600 offers exceptional value with its 6 cores and 12 threads, providing strong performance for both gaming and multitasking. Despite being from the previous generation, it remains competitive with newer CPUs while being significantly more affordable. The included Wraith Stealth cooler is adequate for stock performance.
GPU Selection
The graphics card is typically the most expensive component in a gaming PC and has the biggest impact on gaming performance. Fortunately, GPU prices have stabilized in 2023, making powerful options more accessible.

Our Pick: AMD Radeon RX 6600
The RX 6600 delivers excellent 1080p gaming performance, handling most modern titles at high settings with 60+ FPS. It's particularly efficient with power consumption, reducing the need for an expensive power supply. While ray tracing performance is modest, the overall value is outstanding for budget-conscious gamers.
Motherboard Selection
For our AMD build, we need a compatible AM4 socket motherboard. Since we're focusing on value rather than overclocking, a B550 chipset provides the best balance of features and price.

Our Pick: MSI B550M PRO-VDH Wi-Fi
This motherboard offers outstanding value with built-in Wi-Fi 6, decent VRMs for our CPU, and all the essential features most gamers need. The four memory slots provide room for future expansion, while the M.2 slot supports PCIe 4.0 SSDs for fast storage. The rear I/O includes USB 3.2 Gen 1 ports and a flash BIOS button for easy updates.
Memory (RAM)
For modern gaming, 16GB of DDR4 memory is the sweet spot. While faster RAM can benefit Ryzen processors, there are diminishing returns beyond certain speeds.

Our Pick: Kingston FURY Beast 16GB (2x8GB) DDR4-3200
This 16GB kit strikes the perfect balance between price and performance. The 3200MHz speed is the sweet spot for our Ryzen CPU, offering excellent gaming performance without the premium cost of higher-speed kits. Using dual channel (2x8GB) provides better performance than a single 16GB stick.
 When installing RAM, make sure to use the correct slots for dual-channel operation (usually slots 2 and 4)
Storage Options
In 2023, SSDs have become affordable enough that we recommend them as the primary storage for any gaming PC. For our budget build, we'll focus on a single NVMe SSD with enough capacity for the operating system and several games.

Our Pick: WD Blue SN570 1TB NVMe SSD
The WD Blue SN570 delivers excellent performance at a budget price point. The 1TB capacity provides enough space for your operating system and a decent game library. While not the fastest NVMe drive available, the real-world difference in game loading times between this and more expensive drives is minimal for most titles.
Power Supply
Never skimp on the power supply—it protects all your other components. For our build, we need a reliable PSU with enough wattage to handle our components and potential future upgrades.

Our Pick: Corsair CX550M
The CX550M provides reliable power delivery with 80+ Bronze efficiency. The semi-modular design helps with cable management, allowing you to connect only the cables you need. 550W is sufficient for our build with some headroom for future upgrades. Corsair's 5-year warranty adds peace of mind for this critical component.
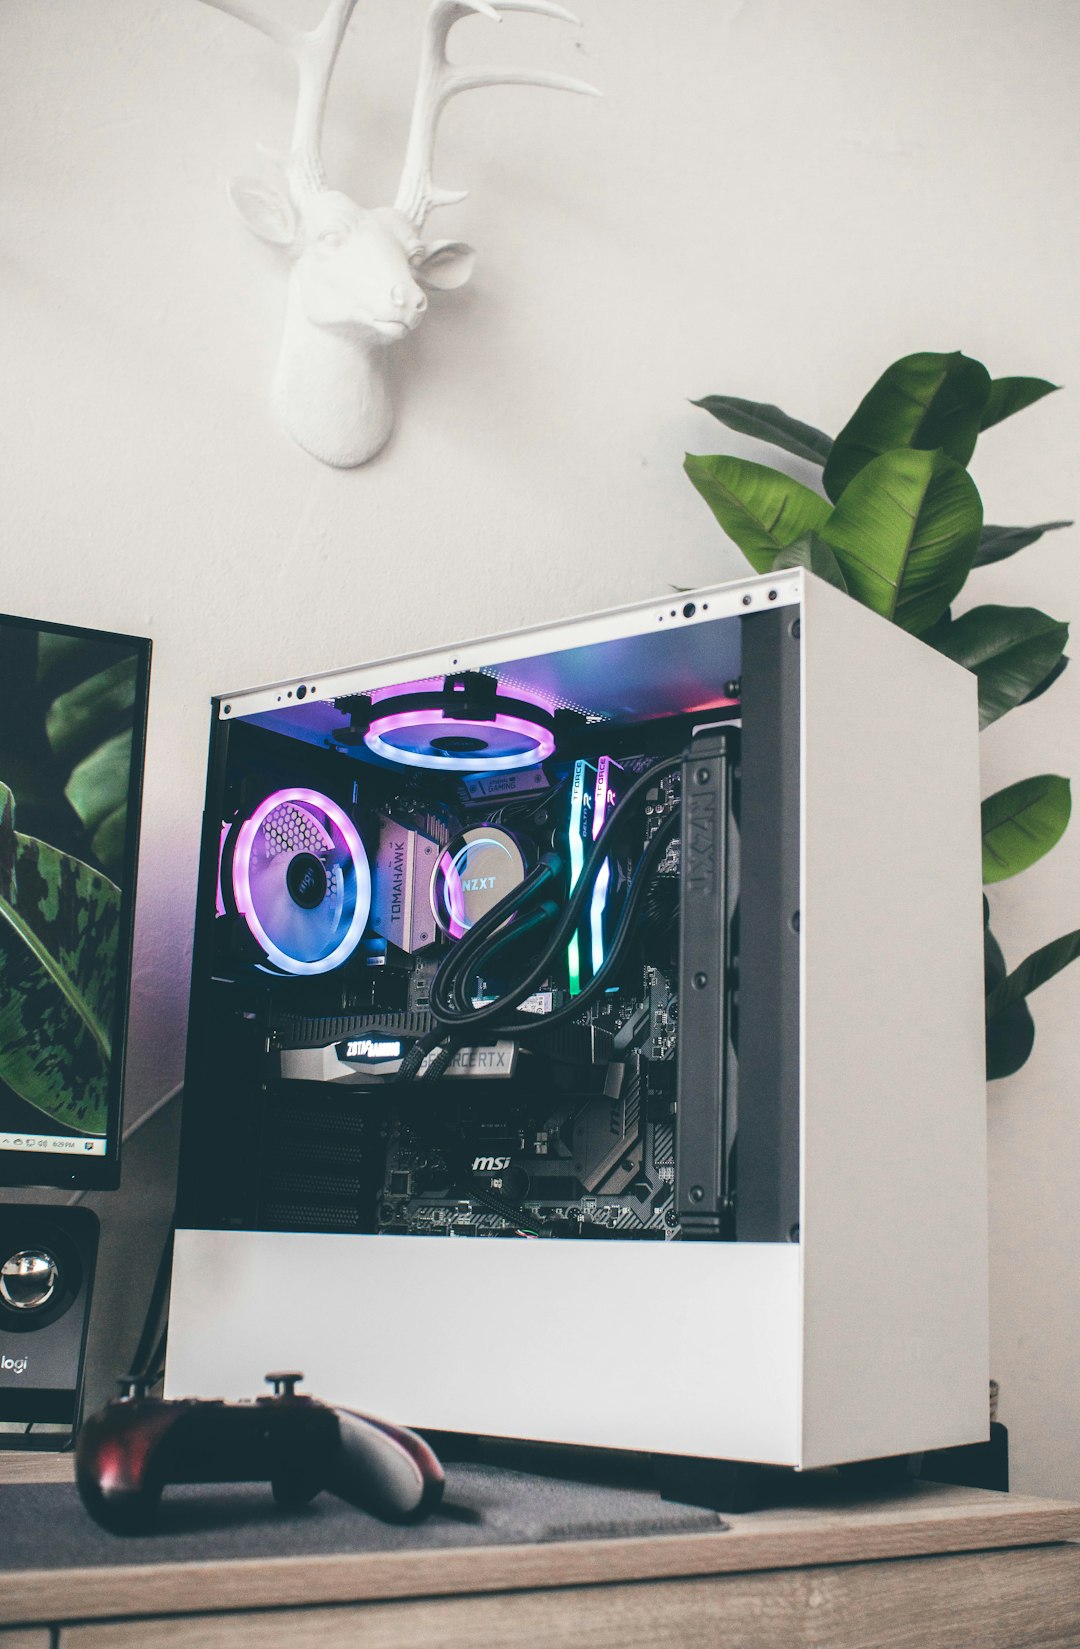
Case Selection
The case is not just about aesthetics—it affects airflow, noise levels, and building convenience. For a budget build, we want something affordable that doesn't compromise on basic features.

Our Pick: Phanteks P360A
The P360A offers exceptional value with its mesh front panel for excellent airflow, included RGB fans, and tempered glass side panel. Cable management is straightforward with ample routing space behind the motherboard tray. Despite its budget-friendly price, it looks and feels like a much more expensive case.
Cooling Solutions
Our Ryzen 5 5600 comes with a stock cooler that's adequate for normal use. However, if you want lower temperatures and noise levels, an aftermarket cooler is worth considering.

Optional Upgrade: Cooler Master Hyper 212 RGB Black Edition
The Hyper 212 is a legendary budget cooler that offers significantly better cooling and noise levels than the AMD stock cooler. The RGB version adds some visual flair to your build while maintaining excellent performance. This is an optional upgrade that will allow your CPU to boost higher for longer periods under sustained loads.
Assembly Guide
Building a PC may seem intimidating, but it's essentially just connecting the right components in the right order. Here's a simplified step-by-step guide:
-
Prepare Your Workspace
Find a clean, well-lit space with plenty of room. Have your components, screwdrivers, and zip ties ready. Anti-static precautions are recommended but not strictly necessary—just discharge yourself by touching a metal object occasionally.
-
Install CPU in Motherboard
Open the CPU socket lever, align the processor (look for the triangle marker), and gently lower it into place. No force should be needed. Close the socket lever to secure the CPU.
-
Install RAM
Open the retention clips on the memory slots (typically slots 2 and 4 for dual-channel). Align the notch in the RAM with the slot and press down firmly until the clips snap into place.
-
Install M.2 SSD
Locate the M.2 slot, remove the mounting screw, insert the SSD at a 30-degree angle, then press it down and secure it with the screw.
-
Prepare the Case
Install standoffs in the case if they're not pre-installed. These prevent the motherboard from shorting against the case.
-
Install the Power Supply
Mount the PSU in the case, typically at the bottom. Ensure the fan is facing the appropriate direction (usually downward if the case has a PSU shroud with ventilation).
-
Install the Motherboard
Place the I/O shield in the case if it's not integrated into the motherboard. Carefully lower the motherboard onto the standoffs, align it with the I/O shield, and secure it with screws.
-
Install CPU Cooler
If using the stock cooler, apply thermal paste if not pre-applied, align the cooler with the mounting brackets, and secure it according to the manufacturer's instructions.
-
Install GPU
Remove the appropriate PCI-e slot covers from the case, align the GPU with the slot, press it in firmly, and secure it with screws to the case.
-
Connect Power Cables
Connect the 24-pin ATX and 8-pin CPU power connectors to the motherboard, and the appropriate power cables to the GPU.
-
Connect Front Panel Headers
Connect the power switch, reset switch, and LED indicators from the case to the appropriate headers on the motherboard (consult your motherboard manual).
-
Connect USB and Audio Headers
Connect the front panel USB and audio cables to the corresponding headers on the motherboard.
-
Connect Case Fans
Connect case fans to either fan headers on the motherboard or to the PSU using adapters if necessary.
-
Cable Management
Organize cables behind the motherboard tray using the case's routing channels and secure them with zip ties for a clean look and better airflow.
-
Power On and Test
Before closing the case, connect monitor, keyboard, and mouse, then power on to ensure everything works correctly.
 Good cable management improves airflow and aesthetics
Essential Software Setup
Once your PC is assembled and verified to be working, you'll need to install and configure some essential software:
-
Operating System
Install Windows 11 or Windows 10 from a USB drive. A retail license costs around 800-1000 DKK, but you can run it unactivated with minor limitations while you save up.
-
Drivers
Install the latest drivers for your GPU from AMD's website. Most other drivers will install automatically through Windows Update.
-
Utility Software
- MSI Afterburner - For monitoring temperatures and GPU overclocking
- HWiNFO64 - For comprehensive system information and monitoring
- CPU-Z - For detailed CPU and RAM information
-
Gaming Platforms
- Steam
- Epic Games Launcher
- GOG Galaxy
Future Upgrade Path
One advantage of building your own PC is the ability to upgrade components over time. Here's a logical upgrade path for this system:
Short-term Upgrades (6-12 months)
- Add additional storage (2TB HDD for media or another SSD for games)
- Upgrade to 32GB RAM if you find yourself multitasking heavily
- Add more case fans for better cooling
Mid-term Upgrades (1-2 years)
- Upgrade GPU to a faster model (the AM4 platform can handle much more powerful GPUs)
- Consider upgrading to a Ryzen 7 5800X3D for significantly better gaming performance
Long-term Upgrades (2+ years)
- New motherboard and CPU platform (AM5 or Intel equivalent)
- DDR5 memory
- PCIe 5.0 SSD
Conclusion
Building a gaming PC on a budget doesn't mean you have to compromise on performance. This build provides an excellent foundation for 1080p gaming with the ability to play most modern titles at high settings. The selected components offer a good balance of current performance and future upgradability.
The total cost comes to approximately 5,750 DKK (excluding Windows), which represents exceptional value compared to pre-built systems at this price point. By building it yourself, you not only save money but gain valuable experience and the satisfaction of creating your own gaming machine.
Remember that PC building is all about making choices that fit your specific needs and preferences. Feel free to adapt this guide based on local pricing, availability, and your particular gaming requirements.


Comments (58)
Leave a comment
Mikkel Rasmussen
May 16, 2023 at 08:32Great guide! I built almost this exact system last month, but went with the RTX 3060 instead of the RX 6600. The ray tracing performance is really worth the extra money if you play games that support it. Everything else in the guide is spot on though!
Sarah Johansen
May 17, 2023 at 12:18I'm planning to build my first PC next month and this guide is incredibly helpful! One question though - would this setup be good enough for streaming games while playing? Or would I need to upgrade the CPU to a Ryzen 7?
Lars Pedersen Author
May 17, 2023 at 14:05Hi Sarah! This setup will handle basic streaming just fine if you use GPU encoding (NVENC for NVIDIA or AMD's equivalent). The 6-core Ryzen 5 is sufficient for most streaming needs, but if you plan to do very high-quality streams of CPU-intensive games, upgrading to a Ryzen 7 would give you more headroom. Happy building!
Thomas Nielsen
May 18, 2023 at 19:24I think the P360A case is overpriced for what it offers. I'd recommend the Cooler Master MasterBox Q300L instead - it's about 200 DKK cheaper and has decent airflow. You could put that money toward a better CPU cooler or more storage.